Showing posts with label set review. Show all posts

Set Review - 75097 Star Wars Advent Part 3

Final day! With our time travel back to the OT it's been fun reminiscing over these vehicles and seeing what have been wortwhile changes (few) and repeats (too many). As of late I've been having a hankering for little droid bots as well. The mouse droid from the Death Star has been sitting on my desk for a while now. I think he needs some company.

Aren't I in luck! Day 3 is a squeeful little LIN Demolitionmech. I don't know what that is but look at its little antenna-wenna! I just want to eat it all uh... sorry. Well if I were to picky I'd say the treads were too big. But it's cute. Maybe it can make little origami cranes with that arm. Or lay mines? Yeah sure, that would be fine too. Adorable little miney-wineys. Shaped like cranes.

Day 20 (hey that's today!) brings us this little Imperial Probe Droid. Given the glut of 'probe' in modern alien pulp culture, I'm not so fond of that name. More importantly, this is a Viper probe droid, with the hanging down arm leg thingies. If I were to be critical there should be more than four appendages, a bettershaped "head", and an antenna on top. Luckily there's an extra antenna included; wish granted! The body would look better as a black travis brick instead of dark bley too. I like the looks of fig sw171 better but this is smaller.

This was a little bit of an eye-opening experience for me. Apparently, I love droid bots. Due to this year's advent calendar I searched back in the archives and started building a bunch of the smaller non-humanoid type droidbots. Let the squeefest begin!

Set Review - 75097 Star Wars Advent Part 2

Funniest quote I've seen so far this season: "Jango bells, Jango bells, Jango all the way". Sadly, there is no Jango this year. Nor is there much of anything new. The LEGO Star Wars Advent calendar seems to have timewarped back to the OT with comfortable characters and settings. But is it... too comfortable?

Set Review - 75097 Star Wars Advent Part 1

Ho ho ho and welcome to this year's scrutiny extravaganza of the LEGO Star Wars Advent Calendar! *yeah*. I've tried to break the relevant micro ships into several categories but the pickings this year are a little slim. This week will focus on new micro-ship designs, next week will focus on repeats upgrades and the final week I'll look at the little droids. Without further ado let the squeefest begin!

Set Review - Format Change

For almost three years now I've been writing about LEGO and it's been a most fulfilling blog experience. I get way more hits and interaction than I do on my house design blog. And for most of that time I've been watching you as you interact with this site.

One of the main reasons I started this blog was to review the smaller polybag LEGO sets. I get a kick out of building these little morsels and wanted to share that with you. Well guess what? You don't care! My set review posts continue to sit near the bottom of the pile waiting for someone to read them. Meanwhile drivel like rebuilding a 10179 UCS Millenium Falcon on the cheap get horded and ogled like the Kardashians. Go figure,

Since Mondays are difficult to plan blog posts for (I've got all weekend! I'll get to it... oh crud) and since nobody's reading, and since I'm starting to expand in other areas of web writing and business, I've decided to scale the set reviews back. Waaay back! You may have already noticed them falling off over the last few months. I'll still have a few of them planned such as the Bricktober marathon and my yearly Star Wars Advent calendar rag. Maybe something in the first half of the year as well.

In the meantime keep selling me things because I plan to keep the Bricklink and BrickOwl seller reviews alive. And the techniques may be a touch spotty but those are popular too. I've got a couple of throwbacks planned that will hopefully inject new life into a dead sub brand.

Oh what else am I writing about? Well I wrote this ebook, see? And part of the deal is that readers of the book can subscribe to an email list where I break down sets and see if they are worth the part out value. It's all very interesting. There's a reason I rarely part out Chima. So I'll analyze sets, give you an objective result and tell you whether you should buy it or not to part out into your Bricklink or BrickOwl store. But you have to read the book to join. Hope to see you there!

Set Review - Tractor 30284

I got friends with tractors, y'know. But I ain't never seen one like this. If you're a tractor fan you may have a hard time placing this make and model. Closest I could find was a Case International 955... with a paint job, modded exhaust and open cab design. Not sure what that's about. This was a TLG S@H promo way back in fall. Maybe it was released to celebrate fall tillage? I'm still unclear on the whole thing.


From the pictures that were leaked at the beginning of 2015 I got all excited about more mini tractors. Building was sort of a joy but 51 pieces really goes fast. Not only do you get a tractor but like the picture promises, a tiller. Most of the time I would expect a tiller (or any attachment) to have a 3-point hookup so that it could follow the tractor when it turns. This (like so many other failed connections) is built with simple droid arms allowing up and down. Sure, these attachments will go up and down but that's not all. Is it? Have I been disillusioned this whole time?

As usual my build includes the extra pieces in a few places to enhance it from the original. It's too late to get the promo from TLG but you could get one on Bricklink. They're barely above $3 and available for almost down to $2. You might even be able to build it with pieces from your collection. Nothing fancy here.

Hey, there's a contest going on! One of those classic "guess the pieces" but you don't get the pieces. I'll give you something else cool though if you win.

LEGO Set Review - Bricktober Toys'R'Us 40144

Well now I honestly didn't see this coming. Makes sense though, right? Back in 2010 We got a minifig size Toys'R'Us truck and storefront. So why not have a mini Bricktober store? Looks pretty good actually. Kind of ironic that it has the lowest piece count of any of this year's promo sets. Toys'R'Us where we give you the least amount possible for the most money possible. That was kind of how I acquired this set. Yes, I paid over MSRP for a couple of sets. But I couldn't price match because price matching and promos are mutually inexclusive in the TRU universe. I take solace in knowing that I still got the sets in question for under 10c per piece. I think that was TRU's goal anyway.

Back to the review!

The TRU store is simple, bright, and effective. Primary colors, heavy on the blue. I'll admit that someone knows something about color theory because it makes me want to miniaturize myself and walk in to browse around. Not necessarily spend, mind you. Like the train station it's a 10-wide module. I call it self-edification. Unlike the train station it has two 4x10 base plates and so doesn't offer the option to shrink it to an 8-wide building. I call that arrogance.

And by the way what is that clear... thing out in front? Is this a micro louvre? It does have a trash bin near the door which seems appropriate. Like the rest of the models, there was plenty of attention given to the rear facade. You can see a roll-up door where overpriced deliveries are made. You can often see employees out here having their prolonged smoke break. The truck is a nice departure from the usual cars. It might make more sense if it was wider as compared to the smaller cars, but then you'd have to embiggen several oif the other vehicles as well.

Part of the reason the piece count may be low is because of the amount of bricks used instead of plates. Given the color massing in some places, bricks easily accomplish what is needed. The efficiency is so good that rather than add another piece type of a blue 1x4 brick, they used the similar brick with 4 side studs. But the side studs are hidden inside the building. Since there's more monetary and build value in the SNOT piece, I swapped mine out for a boring old 3010.

Much as I dislike stickers I think they add something here. Obviously TRU wants their branding and printed pieces may have had more value but much like the prior set, stickers give the welcome option. I ultimately applied my stickers but these shot are sans decor for your viewing pleasure.

It's kind of a relief that Bricktober's over. Though rumor has it that I'm going to need to get into a TRU again soon to get the new off-roader (Hummer) polybag. I'll tackle that trauma when I get to it.

LEGO Set Review - Bricktober Bakery 40143

Why are my TRU purchases always so beset with setbacks? I called my local store to double check that they had last week's Bakery available still so that I could add a few bucks and get the TRU store free. (Not the whole store, but Bricktober week 4). After 10 whole minutes I finally got confirmation that not only did they have it but they also had enough stock of the filler set I was looking for. I thought I had asked them to hold some up front for me but alas they did not. Seemed the whole crew needed coffee and the store wasn't all that busy. Anyway, mission accomplished.


We were on our way to a family gathering so I figured I'd do the build at some point during that time. I decided to handicap myself even further by sitting on the back deck and build the model in my lap. I squeezed parts as needed out of a little tear in each bag - all 234 pieces. I only lost one little Reddish Brown 1x1 round plate down the cracks in the deck. An extra, thankfully. Besides, I've got a bazillion of them anyway.

To see the model on the box art is nice but to see the pieces in the bags is amazing! Such lovely colors! The built model is even more beautiful. I think it comes from a nice variety and usage of sand tones and dark tones. Sand Green, Sand Blue, Dark Sand Yellow (Dark Tan) and Dark Blue all contrast nicely. The Medium Azure and Yellowish Green flowers set the street scene off nicely. There's as many colors as a Friends set but better balanced.


I really like the offset facade. It appears that this is a bakery on the ground floor but two levels of apartments above. There are two obvious front doors to the building, each with their own colored welcome mat. The only waste of pieces I can find is the windows built into the sides. It looks nice when the building stands alone but they will obviously be covered when the modular buildings are attached. Not like you'll have actual people living in there anyway. Of course the rear of the build is well thought out too. Even without all the decor on the front it's just as pleasing to the eye. Texture!


The only thing striking throughout this year's mini models is the color of the 1x2 technic bricks for the connections. Last year the colors blended in very well with the model, this year they are much more noticeable. The conundrum is that the piece has not been made in a wide palette of colors. I'm not sure which tones TLG is running through their molds for this part currently but the Tan color is a little stark against the Sand Green. I may play around a little with some of the different colors I have.

LEGO Set Review - Bricktober Train Station 40142

Ahh, October. Full of leaves and pumpkins and overpriced Toys'R'Us sets. We're cruising through Bricktober 2015 and looking at this year's second promo, the Train Station.

Sort of.

There are several things wrong with this set. Primarily it's the shortest line ever. At 8 studs it's little more than the two cars that fit on the track. It takes more time to queue up than it does to ride it. At least that's the presumption. Sneaking a peek at the back of the box, there's no connections to be made unless the sidewalk spontaneously turns into track. The platform has two signs on it. Both ends of the line? "How far are you going?" "To the end of this fence." But at least the track is dark pearl grey, not just a normal grey!

Second, these things seem to be growing. Last year all of the modules were 6 studs wide and 8 studs deep. This year's hotel is 8x8. But it's a corner module so that kind of make sense, kind of. This train station is 10 studs wide.

Wut?

The draw of the large modular sets is that they are all standardized to a 32x32 baseplate. This means they can be mixed and matched and still all set up nicely. Now in the real world, I understand that building lots can be different sizes. Most often (where I live) they are 50x100' but anomalies happen. Maybe they'll be 60' or 75' wide. So I get the aspect of injecting a little bit of realism. But this is microscale LEGO where the scale is no longer 1:1. Now we're about 1:480. There's not a lot of wiggle room for subtle variation while still staying within a larger uniformity.

Therefore, I decided to redesign my Train Station to be 8 studs wide. But now that I've built it and shot it I realize it still doesn't solve the problem of the shortest ride ever. I think I need to make it 8 studs wide and 10 studs deep so the train track is actually out in the right of way. Then maybe I can expand the track and make it travel all around the town.

But despite these problems there are a few redeeming things about the set. Namely, trans-clear, dark green and roller-skate, roller-skate, ROLLER-SKATE!

By the way, if you would, please petition Great Ole's ghost that I would be able to obtain the next two Bricktober sets. I'd hate to lose out on one and, well, you'd hate to miss a review.

LEGO Set Review - Bricktober Hotel 40141

It's that time of year again! Y'know when TRU runs their overpriced promo requiring you to buy a plethora of overpriced items and you figure out the best way to leave the store with a discount anyway. With this year's requirement of $80 $75 to get a $20 item, it's already a somewhat decent deal. You get $100 $95 worth of toys for $80 $75 so an easy 21% off. Depending on your math (or massage) skills, it can look like more. *(edit: apparently I overspent. I'll try to do better next time)

Pieces!
A brief analysis before I get into review. First, I had intended to walk into the store on Sunday, purchase last week's set, and walk out. But of course I was curious to see what else there might be. I waltzed over to the LEGO corral and browsed the shelves. Five Halloween Bat 40090 sets, 156 pieces for $3.99 each? Deal! Plus the Bricktober set I was buying, I was halfway to getting this week's promo. Browse for "clearance" deals, check the phone for part out value. Finally settled on a Star Wars Advent Calendar for $43.

With 156 pieces, the bat sets should be selling for $15 but the internet says they were $10 last year. The Advent Calendar usually sells for $40 but, well, TRU. Add in two Bricktobers (purchase and promo) and I had a value of $110. Sales price $83. That's almost 25% off. Probably won't be able to pull that one off again.

Landscaping!
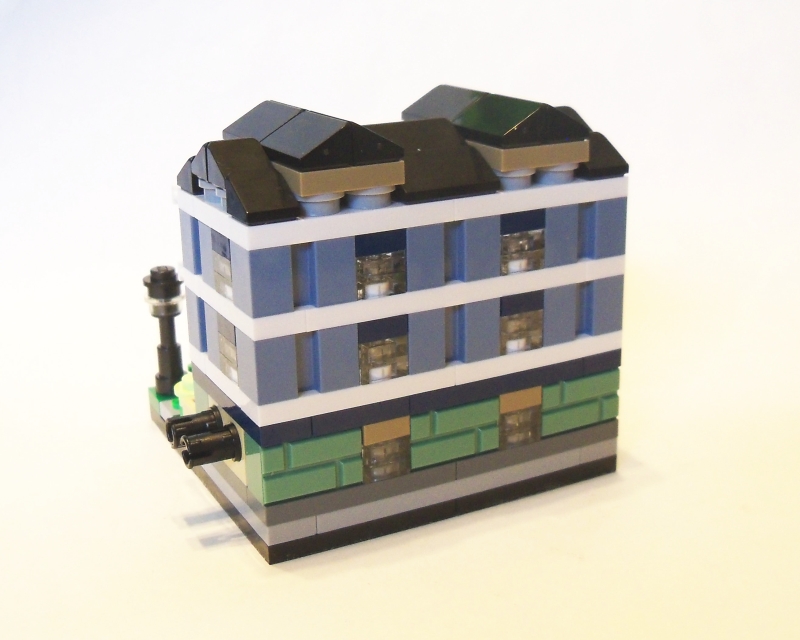
I was ecstatic to see the Bricktober sets make a comeback this year. I've still got last year's lineup sitting on my credenza; it will be fun to increase my street scene. I assembled the Hotel with my children. Each of us built a couple of pages until one of them raised a stink. Then the rest of us finished the set while she got personal alone time.

The detailing in the front gardens is gorgeous and it makes me wish for Mini Modulars II to come out. All the tiny little pieces and implied detail make me giddy. A small surprise this year was the single sticker on a paneled piece. I'm usually pittakionophobic but was all too happy to dress up the single panel with a name.

Corner!
The most fabulous part of this build is not the detail, though that is incredible. The gardens are varied shades of green and floral colors including medium azure and dark magenta. There's even some sand green unicorn horns to act as shrubbery. There's a trellis out the side that is beautiful. The fountain and reflecting pond are incredible touches.

The most fabulous part is the design of this model as a corner module! At first I thought I'd have to put Bricktober 2014 on one side of the street and BT 2015 on the other. Now I can create an intersection for even more rousing dioramic excitement. I have some issues with what I think I see in the other sets but I'll camp on this for now.

This promo doesn't appear to be good online. You've got to actually take a breath and darken their door. I hope you find some bats.

Extras!

Set Review - Porsche 918 Spyder 75910

Of all the supercars I grew up salivating over, the Porsches have always been the most unique to me. As someone who enjoys lists and organization, I had a high appreciation for the numbering system used to name the cars (except the 356, what happened there?). In our final review of the original Speed Champions line we take a look at this rather unique supercar.

 Total mindblow, in looking up a chart to reference all of the Porsche models I discovered the 597. Less of a mindblow was the 550 and 904 that I hadn't known about up until now. However the 911 seems to have the most variation as well as what I would call spinoff models. Not just Targas, Carreras and Targa Carreras but the 912, 930, 964, and all the 990 series. The 918 is not a direct derivative of the 911 but it looks like a concept racing version of the same car. At least, in the LEGO model, the 918 was a bit difficult to perfect and the 911 look is where the model landed. Regardless of the intent, I'm satisfied.


So of course I was thrilled that I ended up building the Porsche. Much of the SNOT work was familiar but the amount of it and the result was fabulous. I've built official LEGO models before that have ended up with little gaps behind brackets and other areas where the half plate gap looks gaudy. In this case those gaps are either filled or intentional. Stellar!

As far as the undersides of the cars go, this one is probably the best looking. The other models have used red, yellow and green parts that did not match the cars' liveries well. In the Porsche most of the "hidden" pieces are blue. There is red visible from the underside but most of it is used to build the interior.

The Porsche is also the only model that uses a different windscreen. It's the same one used in the larger Porsche 911 Finish Line set but no where else (so far). It's a neat element with more of a 3d feel than the classic City windshields. It also has a nice more realistic pitch to it than about 65°. However the integral side windows are going to limit the use a little bit, especially if you want functional doors.

While the scope of this blog is to generally focus on the smaller polybags and under $10 sets, this was a fun diversion. I don't expect to be doing any of the other Speed Champions sets unless we get some new models in the next run of the series. But I would say that these are amazing builds if you want a nice City sized compatible car with plenty of detail.

Here is the entire line on LEGO Shop@Home (Your purchases help support this blog):


Set Review - McLaren P1 75909

The third set in our review of the Speed Champions singles is the McLaren P1. My second daughter built this. If you're like me (and I know I am) then you understand what a second child is like. First children are very meticulous rule followers. Anal retentive if you will. Second children tend to be more free-spirited. Let's have fun! Wait! No, let's stop this fun and have more fun! Almost anal expulsive.

 Anyway, let's just say that a build in bright light orange livery was the best choice for this sweet child of mine. There were several complaints that pieces in the instructions didn't actually exist. I'd quietly pick them and listen to her rant for another minute before seeing it. But I love her all the same and she did finally finish it.

Despite the fact that red and yellow 1x2 plates obviously are (or were if you're reading this in the future. Hello future!) in production based on the other models, I'm surprised at the choice of green for some for the underbody work. I was afraid that there would be some confusion with the colors between bright light orange and yellow but it went fine. More confusion was caused (with me at least) at the disparity of color choice for the support pieces. Yeah, it's not like you can see it at 200mph but when the car flips it's like someone set a Christmas tree on fire with all the colors.

I also didn't like the long nose so much. I understand that there was a particular aesthetic that was being aimed for here and it needed an extra stud of body in front of the front wheels to do it. It just doesn't look right. Maybe because of those chunky fenders. Something a little lighter would have allowed room for a headlight brick behind which in turn could have converted the 1x2 45° slope into a cheese wedge instead. It makes sense in my mind anyway.

For her, the coolest part about the car was the spoiler. The attachment doesn't quite match the IRL car. It should have used droid arms to be more closely matched. But that didn't matter to her. It could have been attached with duct tape and she wouldn't have cared. Whatever, it's a snowboard! Of course it came off and the driver was suddenly transformed from shooting a steel and glass bullet at 200mph to shooting a poly-resin board around at slightly less speed.

Again, I built these sans stickers so that you, dear reader, could see what the cars look like naked. I think they still look kind of cool in all their natural glory. Sure you don't get some smoothing of curves or intakes (nor does the McLaren especially look the IRL car) but they are a neat scale nonetheless. I look forward to more of these in a second wave.

Next week! German engineering!


Set Review - 458 Italia GT2 75908

Ooh, another Ferrari! TLG and Ferrari seem to go together like peas and carrots. And Shell. But they're bad so we won't discuss their relationship in the tri-fecta. Let's talk about Octan instead! Or more like Hublot the, um, watch maker? Interesting...

This little racer was built by my oldest KFOL, an 8 year old girl, as in, "You build like an 8 year old girl!". Let me tell you, that's a compliment! She knocked this whole thing out without any questions or fuss. Only once did I need to clarify the instructions (totally TLG's fault, I'm sure). As I mentioned before, the build techniques are all similar and this one seems to be the poster child.

It's also got the most printed windshield with both a name and door frames emblazoned upon its top plane. This makes it look slightly aloof without any stickers on it. I'm not much of a stickerer. I prefer the pure unadulterated look of plastic. So even though these sets come with a plethora of stickers for each car, it was with remorse that I had to tell my 8 year old daughter to take off the sticker she had just put on. Mostly I wanted to photograph the completed cars sans stickers for you to see. "Once daddy's taken pictures of the cars, we'll put the stickers on." I didn't lie, it just STILL has yet to happen.

But even without the stickers there's plenty of eye candy. The striping on the car over the rear fender is very clever. With a curved slope and a technic doohickey, my brain is tricked into believing that the curvatures came straight out of a wind tunnel session. The technic doohickey actually supports the tail light but it also changes the direction of the curve in a small space giving a very smooth appearance. Still not as smooth as the real life car but I prefer the blockiness of an F-40 anyday.

In what I thought was a mistake, a couple of yellow cheese slopes are placed on the back of the car. Apparently the stickers help carry this swoosh up the back of the car. Even so, it still looks a little funny but I can see how they're trying to match the racing livery.

Best part? Check out that tail.

Set Review - La Ferrari 75899

Week one of the Speed Champions! No, not Speed Racer. That was so 2008. Nor Speed Slammers. That was so yeesh. These are the true champions of speed featuring lots of horsies.

My four year old son built the La Ferrari. Sort of. He put together the driver, grabbed a few more pieces and got through step 3. Then the neighbor kid came over and hung out with us a for a while, advancing the model at least halfway. After he left I completed it. Oh the techniques!

I doubt it would be possible to capture the curves and lines of this car even at full scale. But the subtle use of curved slopes and other rounded pieces with offsets and SNOT do a fair to middlin' job of conveying the essence of beauty and the 4 and a half dimensions that the car was designed in. Ans since I'm not much into stickers, I'm basing this off the pure plastic.


My favorite piece is the 1x4 plate with a turned down bar. How unexpected! But the bar helps give the distinct look to the nose.  Would that some of the hood curves were only a half step instead of a full one. That would have sold the lines all the more. But we're talking about a production model here, not a one off MOC. Even so, I find little to complain about.


Except the bottom. Expect this on every car. There's a white and yellow piece on the bottom and a completely useless red 1x2 plate. This car is not nearly as bad as others, but I can see the driver's pants from below. Two extra 1x6 to fill in the chassis would have been a nice touch.

The rolling sucks too. Seriously sucks. I can push this car hard on a wood floor and if it makes it all of two feet then it wins a trophy. Two. Feet. My Hot Wheels can totally dust this so called "super-car".

The final novelty is the (re?)introduction of the trans black 2x2 brick. This part has a street value higher than crack and you get TWO of them in here! Heck yeah, come find me in the alley bro!

Set Review - Speed Champions overview

Welcome race fans! For the next four weeks I'll be reviewing the Speed Champions cars. These got my heart racing the moment I saw them. Larger than City scale, somewhat minifig scale (though only one passenger) with incredible detailing. The most exciting thing is the licensing deal that TLG acquired to produce cars from not just Ferrari but McLaren and Porsche. Porsche was a classically difficult brand to license but it IS under Volkswagen AG. Who knows, maybe we'll get a Bugatti Veyron or a Lambo next?

I challenged the kids to a new way to build. I dumped all of the pieces of ALL four sets in a big pile together. We all chose cars (or at least mine was chosen for me) and we commenced. It was delightful to watch the frustration and hear "This piece isn't here!" But we got them all built with only one error and had fun.

When I dumped out all the pieces, several of them caught my eye. These are some of the newer molds and a few are made in several colors. It's kind of disappointing that every single car uses 4 of the new bulky POOP fenders. And the Technic wheel holder POOP is a shame. But the new 2x6 rounded plate is neat and will have it's uses.


Also cool are the new spoked wheel covers. The nice thing about these is that they allow for a smaller mold to customize your car. One wheel to rule them all with a central stud allows for any of the little bits to snap on. Each car comes with two styles meaning 8 covers in all. Of course these are going to have way more uses than just wheel covers. With a central anti-stud and a diameter of ~14.8mm, they are just smaller than a 2x2 space and can click in place. My first thought was roof fans for a 4-wide train. But I bet all sorts of other greeblers have their heyday.

And then there's the windshields. Really there's only two windshields. But the larger one is used in three different ways; two with print and one plain. These are 4x6x2 with a nice curved slope and a front base that matches a 4L diameter round piece. Spacers and racers ought to enjoy these. It's a nice touch to include them plain to increase their variety of uses. The bright light orange striped one ought to still be useful but the Ferrari one is pretty limited.

Amongst all four sets are a variety of extra parts. They're all the extras you'd expect but it looks cool to see them all laid out and combined from all four sets. In reality you get multiple extras of the red pieces, the dark red tiles and the grey bits.


As you may notice there's both yellow and bright light orange. The colors are similar enough that I was afraid there was going to be some confusion and cross uses. It only happened once and we caught it early on.

The base construction of all cars are very similar. They start with a city vehicle base which is then extended 3-4 studs in each direction. All the cars are built to 6-wide and use brackets on the sides to create a SNOT effect. Two of the cars use a very similar technique and are almost indiscernible from the bottom. I would have liked to have seen a touch more variety but I guess if a technique works, use it! As seems to be typical with most builds, the "hidden" bits are built without any sympathies to the color of the overall build. This was only mildly disappointing but a little shocking on one build.

Each car also comes with a driver and a little mini-build that I assume enhances the play experience.

Next week, why does every other Speed Champions car start with 759xx but La Ferrari is 75899?